
I’m a Fan of Everything Reused, Upcycled, Recycled… You Name It!
Especially when the upcycling adds more value than the material originally had. There’s something magical about transforming what once seemed like waste into something that feels special, useful, and beautiful.

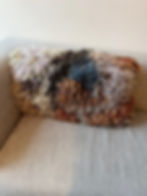
Last time I was in Iceland, I treated myself to some yarns from Textílbarinn, a treasure trove of textile waste turned into creative gold. These yarns are made from cut-offs and scraps that on their own look so unappealing you’d never guess they were ever meant for something bigger. Still, I found myself drawn to their uniqueness. I picked out a few skeins with different colors and textures, guided (as always) by my eye for neutrals with a few pops of contrast to bring that wow factor to the final piece.

I had no clue what I was going to make. But somehow, these yarns felt right. They were the ones I gravitated toward.
To add to the mix, I picked up some delightfully tacky yarn from Garn í Gangi they even told me it hadn’t been touched in years. So yes, I was proudly rescuing unwanted yarn and hoping to turn it into something beautiful.
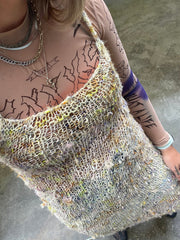
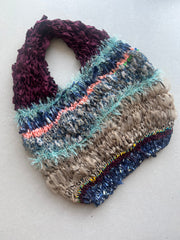
Turning Trash to Treasure: The Birth of the TnT Bag

After coming back home, I started to form a vision. I wanted to make a bag, something practical but artistic, structured yet playful.
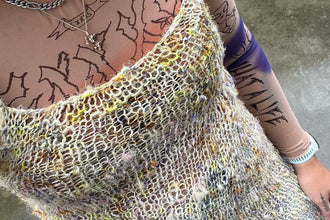
I started with a solid, even base, working in the round and increasing evenly. Once I had a good foundation, I used an old technique I developed back in design school to create an irregular, almost organic look in the rows. You can see the process in the video I’ve shared below.
I encourage you not to follow this pattern too strictly consider it more of a creative guideline. The yarns I used were each so unique that they demanded their own attention. Yours will too. Feel free to mix and match colors, blend textures, and even cut your own old fabrics into yarn. That’s the beauty of it giving something forgotten a new kind of value.

The TnT Bag (Thelma & Textílbarinn)
Size: Large
Tools: 10 mm circular needles
Yarn: Upcycled scraps or textile cut-offs
You’ll be knitting in the round.

See how I cast on and play with the irregular stitches in this tutorial.
Bottom/Base:
Cast on: 21 stitches on each side of the circular needle (42 total).
Row 1: Knit all stitches in the round.
Row 2: Increase by 12 stitches evenly across the row.
Row 3: Knit all stitches.
Row 4: Increase again by 12 stitches evenly across the row (you should now have 66 stitches).
Body:
Continue knitting in the round.
Play around with the irregular technique shown in the video. You can throw in a plain row between textured ones.
Knit until you’re happy with the size. Keep in mind: the bag will stretch, especially when it carries weight.
Handle:
Divide the bag like this: From the beginning of the round: Knit 13 sts, bind off 7 sts, knit 26 sts, bind off 13 sts, knit the final 13 sts.
You’ll now be knitting back and forth on each side.

Shaping the Handle:
Choose one handle side to work on. Place the other on a stitch holder or cord.
Decrease rows (knit side): Slip 1 stitch purlwise, knit 2 together, knit to last 3 sts, knit 2 together, knit last stitch.
Purl row: Slip 1 stitch purlwise, purl all stitches.
Repeat this shaping until you have 20 stitches.
Lengthen the Handle:
Continue knitting without decreases until you’re satisfied with the length.
Now, increase back up to 26 stitches:
On knit side: Slip 1 stitch purlwise, make one (M1), knit to last stitch, M1, knit last stitch.
Finish:
Use mattress stitch to join the handle to the resting stitches.
Weave in ends & admire your one-of-a-kind bag.

Final Thoughts
This project is about playing. It’s about giving forgotten materials a new life, and not being afraid to experiment. The TnT Bag is more than a pattern it’s a philosophy. So whether you’re using rescued yarns, your grandma’s old sheets, or that fabric scrap you’ve been saving for “something special” this is your chance to make it count.
Let your creativity run wild. I’d love to see your own version of the TnT bag—tag me if you share it!
With love
Thelma
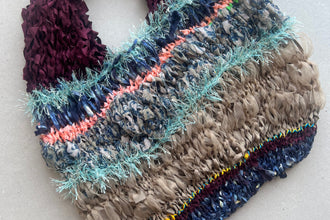
Free pattern of the amazing upcycled TnT bag designed by Thelma out of leftover textiles.